Tuesday, December 12, 2023

Fifth Grade: Octopus

Fifth Grade: Octopus   

    For the second project of the year, all of the classes will be making a glow in the dark sea creature! We will be using glow in the dark paint and neon oil pastels to make our sea creatures come to life. At the end of the year art gallery, we will display all of the glow in the dark sea creatures in our very own Glow Gallery!

(Photo courtesy of Cassie Stephens' blog) 

Each grade will do a different sea creature. Please scroll down to find the instructions for octopus for the 5th graders. 

Supplies: 

  • Rectangular mixed media paper
  • Neon/florescent oil pastels
  • Black marker
  • Pencil
  • Florescent tempura paint cakes
  • Water bowls with sponges 
  • Paintbrushes
  • Color wheels 
  • Spray bottles with neon paint 

    Please use the document camera in the classroom to show the step by step instructions. One art volunteer can sit at the desk at the front of the room to demonstrate the steps and guide the students through the project. Here are step by step instructions for how to draw and color the octopus. These will also be printed out and available in the classroom for you to lead the students through the project. 

    Try to save a few minutes at the end of class to turn the lights off in the classroom and turn on the black lights that are in the art closet (or they may already be plugged in around the room). The kids will love getting to see their art projects glow! The oohs and ahhs will be worth it! ;) 


1.     Name & Teacher name on the back in pencil 


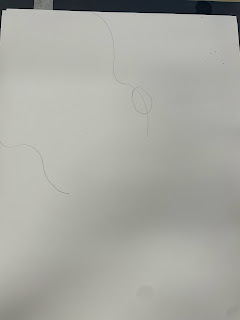
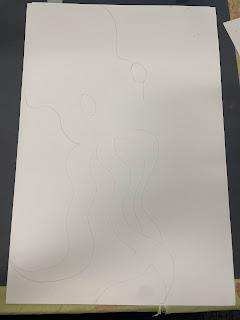
2.     Will draw the whole octopus in pencil and then trace in marker


3.     Start with head of octopus coming out of the left side of the paper


4.     Draw the right eye ball, then erase the line in the center of the eyeball


5.     Draw the other eye ball


6.     Draw the 8 ARMS.  

a.     FUN FACT: even though most of us call them tenticles, the little apendages that come off the octopus body are actually called arms. That is because arms have suckers all over them, and tenticles only have suckers on the very end) 

7.     Make one slightly wavy line and then follow that line again starting wider at the body of the octopus and getting thinner and thinner as it comes to a point. 


8.     Once you have all your arms drawn, time to trace with your black marker


9.     Now its time for the oil pastels. 

a.     FUN FACT #2 Although they look a lot alike, Oil Pastels are not crayons. Oil pastels are very rich, soft and creamy. Hence, they are very easy to smear, blend in, layer, mix, shaded, all with the help of our finger. As opposed to that, crayons are harder and the two crayon colors don't really mix together, very well.


10.  Talk about the color wheel and how colors near eachother on the wheel are called Analogous colors and those opposite eachother are called complementary. We will be using analogous colors because they look aesthetically pleasing next to eachother and are easier to blend together to produce a more realistic look


11.  Demonstrate how oil pastels can be blended together with your finger


12.   **BEWARE** the blue and purple oil pastel doesn’t show up well under the black light. For best results, use those colors very sparingly. You can turn off lights and show what the examples look like and point out where the blue and purple is and how it shows more like a shadow and how the other colors pop. 


13.  BE SURE to color in the eyes of your octopus with the yellow oil pastel….it will pop the most! 


14.  When the body and arms are colors in its time to make the suckers. 


15.  Using a complementary color draw small circles randomly all over the body and arms. 


16.  We will use tempura paint cakes to paint the ocean background. 

a.     FUN FACT #3 Tempura paint cakes are awesome. They are a mix of liquid tempura paint and watercolor. They are much less messy and create no waste!!  


17.  Using tempura paint cakes is a lot like using watercolors. Get your brush wet and rub it on top of the tempura cake. The water will soak in and the paint will become brighter on your brush. These colors also blend together nicely. We want to stick with blue and green for the background so the ocean fades to the back and the octopus pops off the page in the black light. 


18.  Once your ocean is complete, take your drawing to the spray station. (Make sure to carefully shake the spray bottles of paint as the paint settles on the bottom). 


19.  Using yellow neon water color in a spray bottle, spray the painting—a little or a lot! It wont show up well in the regular overhead light….but when the black light shows up, it’s will look amazing!:) 


20.  Make sure to take a few moments at the end to turn off the lights and turn on the black lights!! 


21.  Have students put their painting in the dry rack when complete. 


Sunday, December 10, 2023

Fourth Grade: Sea Horses

Fourth Grade: Sea Horses


    For the second project of the year, all of the classes will be making a glow in the dark sea creature! We will be using glow in the dark paint and neon oil pastels to make our sea creatures come to life. At the end of the year art gallery, we will display all of the glow in the dark sea creatures in our very own Glow Gallery!

(Photo courtesy of Cassie Stephens' blog)

Supplies: 

  • Rectangular mixed media paper
  • Neon/florescent oil pastels
  • Black marker
  • Pencil
  • Florescent tempura cakes
  • Paint brushes
  • Water bowls with sponge
  • Baby wipes
  • Spray bottles with neon paint 
  • Black light


    Please use the document camera in the classroom to show the step by step instructions. One art volunteer can sit at the desk at the front of the room to demonstrate the steps and guide the students through the project. Here are the instructions for the seahorse & example pictures. These will also be printed out in the classroom for you to follow. 

    Try to save a few minutes for at the end of class to turn the lights off in the classroom and turn on the black lights that are in a box underneath the desk at the back of the classroom (or they may already be plugged in around the room). The kids will love getting to see their art projects glow! The squeals of delight will be worth it! ;) 


1. Write your name and your teachers's name on one side of the paper with your pencil. Pick up a black marker. Start by drawing a slight S shape on the top middle of the page. This will be the top of the sea horse's head. 


2. Next draw another S shape in the opposite direction to form the bottom part of the sea horse's head. Leave a little bit of space where the nose comes to a point. 


3. Draw the end of the nose and add a nostril.


4. Draw a circle the size of a quarter for the eyeball of the seahorse. 


5. Draw a smaller circle inside the eye and add a semi circle on the top right for a highlight. 


6. Color in the eye leaving the semi circle white. 


7. Draw a row of half circles going down the back of the seahorse's head. 


8. Next draw a big curved line for the back of the seahorse's body. Swoop down at the bottom, coming up slightly for the start of the tail. 


9. Finish the curve of the seahorse's tail, swirling around a bit. Make sure to leave yourself room to draw the other side of the tail. 


10. Draw a line along the front part of the belly, starting narrow at the top and getting a little bit wider before getting more narrow again near the tail. 


11. Draw small lines on the contour of the seahorse's belly. Start out curved down at the top and slightly make the lines more straight as you get to the middle and then start curving them upward. This will give the seahorse some dimension. 


12. Draw three or four spikes along the back of your seahorse. 


13. Now connect the spikes will curved lines to create a webbed look. 


14. Next draw some spikes along the back of the head


15. Draw curved lines to connect the spikes and make more webbing. Draw lines to connect down to the body at the end of the webbing. 


16. Draw spikes along the bottom part of the body. 


17. Complete the webbing on the bottom part as well. 


18. Now we are going to move on to coloring our seahorse in with oil pastels. Oil pastels are so fun and different to use because you can blend them together to create different colors! You don't need to push hard with the oil pastels and you also don't need to color the entire thing in so there is no white showing. After you color a little bit, you can blend with your fingers. (Baby wipes need to be passed out during this time so students can wipe their fingers off as they go and change colors). 

Also a note about the neon oil pastels: the purple, blue and dark turquoise don't show up as brightly as the other colors. Use them sparingly or as contour colors. For the best results when blending two colors, make sure they are next to each other on the color wheel, or your colors will turn muddy. There are color wheels in the art closet area that may be helpful for students to look at! Place 2 on each desk so they can plan their colors. 


19. Color in the head, the fins and the contour on the front of the belly with the oil pastels. Then add some designs on the body of the seahorse. In the next step we will paint the body with neon tempura paint, which will resist the oil pastel designs. 


20. The tempura paints can be blended as well. They work similarly to water color paints. Get the paintbrush wet and swirl it around on the tempura cakes. These can be buildable, so if at first the paint is too light and you want it to be more vibrant, get more paint on your paintbrush. 


20. Next we will paint the background of the seahorse. If you want to have any designs or seaweed, etc in the background, draw them with oil pastels first and then paint over it all with tempura cake paint. 


21. Next if you would like to add neon splatter to your seahorse, take turns taking your seahorse to the spray station and one of the volunteers will help you spray your picture. The neon yellow stands out the best, but the other colors look great, too! Volunteers please carefully shake up the spray bottles of paint as the paint tends to settle on the bottom of the bottle. 


22. Turn the black lights on around the room and turn the overhead lights off. Check out how your seahorse glows! 


POP ART SELF PORTRAITS - 2024

 POP ART SELF PORTRAITS Author: Melissa Hooker For this project students will be tracing their own photos to make an Andy Warhol inspired Po...