
Supplies needed:
- Large messy mat's laid vertical
- White mixed media paper
- Water bowl/Sponge
- Large Paintbrushes
- Small paintbrushes
- Black Markers
- Pencils
- Paper towel
- Paper plate with paint: 2 wells of Blue, yellow, orange, brown, tan, white, small amount black
IMPORTANT NOTES:
1. Write name & teacher name on paper.
2. Turn paper vertical like a tall building.
3. Using a light piece of chalk, make a mark at the bottom one third of the paper.
4. With a thick flat brush paint the upper 2/3 of the paper blue. This tempura paint is slightly translucent, so we want to make sure to use a lot of paint here so it’s a nice dark blue when it dries. About 1.5 wells of color.

5. Clean Brush thoroughly.
6. The bottom 1/3 will be painted Green. Paint in small strokes back and forth and look like grass. Go over top of the blue a little bit…this will create a darker horizon in the back we will work on later.

7. While taking a moment to let the paint dry a little bit, we will show the 4 minute video on Vincent VanGogh!
Starry Nights & Sunflower are worth 100 million dollars if sold today! If you ever want to see the the original Starry Nights painting, it is in the Museum of Modern Art in New York City! The original Sunflowers painting is in the National Gallery in London.


8. SWIRLS
Dip a clean large round brush into the white paint and start to make two swirls across the page. Your students can first use a piece of chalk to mark out the swirl if they would like to, or they can just go for it with the paint. The blue paint won't be completely dry yet so as they make the swirls/wind thicker and more wispy the white will mix with the blue a little to create a light blue color. That is exactly what we want.


9. STARS
Using what paint is left on the brush, make a couple of "stars" in the sky as well with that light blue color.

10. HORIZON LINE
Using the small flat brush, mix a dark color for horizon line. Use short brush stokes that from far away will look a little bit like trees.
1 scoop blue + 1 scoop green + 1 dab black/brown

11. SKETCH SEED
Using a piece of chalk, we will mark out the middle of our sunflowers (the seed). 2-3 large sunflowers will be best and students can choose where to place them. Just have them be far enough apart that it leaves room for the leaves.

12. PAINT SEED
2 scoop brown + orange + yellow + tan + mix on paper plate

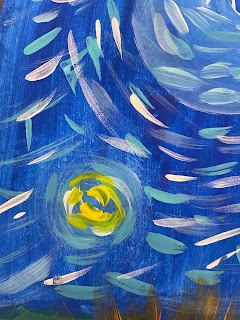
13. WIND & STAR BRUSH STROKES-TURQUOISE
Using a small flat brush we will now make turquoise paint using blue and green - NEED TO FIGURE OUT THE RATIO HERE!
Using a small, pointed brush use a light blue color for our first set of wind/sky/star brush strokes. These will be unique to each student but have students watch you first before doing it themselves. Help them to understand the movement of the sky and to keep brushstrokes going in the movement that makes sense.


15. REPEAT PROCES WITH LIGHTER TOURQUOISE & BRIGHT WHITE
Make sure to make a white dot in center of star
16. SUNFLOWER PETALS
Using the large round brush mix an orangish color for the petals.
2 scoop orange + 2 scoop yellow + 1 scoop brown
*****WIPE ACESS OFF BRUSH WITH PAPER TOWEL******
Now put some of that just mixed orangish paint on the same large round brush to make the sunflower leaves. This will be the first layer of leaves, so its ok if its opaque. Start on the inside close to the seed and then flick the brush out toward the end to the leaf looks more realistic. Do this on all flowers. The brown seed part will not be completely dry so its ok if your brush picks up some of the brown, it will create a difference is leaf shade which will help the flower again look more realistic.


16. STAR GLOW
Using a small, pointed brush and plain bright yellow, make your stars glow.

17. INNER SUNFLOWER PETALS
Using the large round brush (and maybe even a smaller brush) and the plain bright yellow, create the inside petals of the sunflower. Again, the colors are going to run together and that is what we want.

- Start this lesson with a 1 minute tutorial of how to properly clean a paintbrush in water & wipe the excess on the sponge.
- This lesson involves paint mixing for specific colors.
- The order of this lesson is fairly specific - going back and forth between the upper part of the painting and the lower part to allow for some dry time in between.
1. Write name & teacher name on paper.
2. Turn paper vertical like a tall building.
3. Using a light piece of chalk, make a mark at the bottom one third of the paper.
4. With a thick flat brush paint the upper 2/3 of the paper blue. This tempura paint is slightly translucent, so we want to make sure to use a lot of paint here so it’s a nice dark blue when it dries. About 1.5 wells of color.

5. Clean Brush thoroughly.
6. The bottom 1/3 will be painted Green. Paint in small strokes back and forth and look like grass. Go over top of the blue a little bit…this will create a darker horizon in the back we will work on later.
1 well blue + 1 well yellow = mix on plate for 30 seconds

7. While taking a moment to let the paint dry a little bit, we will show the 4 minute video on Vincent VanGogh!
Starry Nights & Sunflower are worth 100 million dollars if sold today! If you ever want to see the the original Starry Nights painting, it is in the Museum of Modern Art in New York City! The original Sunflowers painting is in the National Gallery in London.

8. SWIRLS
Dip a clean large round brush into the white paint and start to make two swirls across the page. Your students can first use a piece of chalk to mark out the swirl if they would like to, or they can just go for it with the paint. The blue paint won't be completely dry yet so as they make the swirls/wind thicker and more wispy the white will mix with the blue a little to create a light blue color. That is exactly what we want.


9. STARS
Using what paint is left on the brush, make a couple of "stars" in the sky as well with that light blue color.

10. HORIZON LINE
Using the small flat brush, mix a dark color for horizon line. Use short brush stokes that from far away will look a little bit like trees.
1 scoop blue + 1 scoop green + 1 dab black/brown

11. SKETCH SEED
Using a piece of chalk, we will mark out the middle of our sunflowers (the seed). 2-3 large sunflowers will be best and students can choose where to place them. Just have them be far enough apart that it leaves room for the leaves.

12. PAINT SEED
Using a clean large round brush mix a dark chocolate brown for seed of sunflower. paint over the chalk and fill in the seed of the sunflower. It may be slightly opaque so have students use a fairly thick layer of paint here.
2 scoop brown + orange + yellow + tan + mix on paper plate

13. WIND & STAR BRUSH STROKES-TURQUOISE
Using a small flat brush we will now make turquoise paint using blue and green - NEED TO FIGURE OUT THE RATIO HERE!
Using a small, pointed brush use a light blue color for our first set of wind/sky/star brush strokes. These will be unique to each student but have students watch you first before doing it themselves. Help them to understand the movement of the sky and to keep brushstrokes going in the movement that makes sense.


15. REPEAT PROCES WITH LIGHTER TOURQUOISE & BRIGHT WHITE
Make sure to make a white dot in center of star
16. SUNFLOWER PETALS
Using the large round brush mix an orangish color for the petals.
2 scoop orange + 2 scoop yellow + 1 scoop brown
*****WIPE ACESS OFF BRUSH WITH PAPER TOWEL******
Now put some of that just mixed orangish paint on the same large round brush to make the sunflower leaves. This will be the first layer of leaves, so its ok if its opaque. Start on the inside close to the seed and then flick the brush out toward the end to the leaf looks more realistic. Do this on all flowers. The brown seed part will not be completely dry so its ok if your brush picks up some of the brown, it will create a difference is leaf shade which will help the flower again look more realistic.


16. STAR GLOW
Using a small, pointed brush and plain bright yellow, make your stars glow.


17. INNER SUNFLOWER PETALS
Using the large round brush (and maybe even a smaller brush) and the plain bright yellow, create the inside petals of the sunflower. Again, the colors are going to run together and that is what we want.


