The first project for the 2023-24 school year for 1st through 5th graders will be the Fauve Style Self Portraits. (note: Kindergarten classes will do this project later in the year). We are looking forward to having a self portrait gallery at the end of the year Art Show!
Here are a few examples of fauvist portraits. Fauvism is the style of "les Fauves," a group of early 20th century modern artists whose works emphasized bold, bright colors not used in usual placement on the subject matter. The colors were meant to express feelings and were not faithful to reality, but moreover how the artist feels.
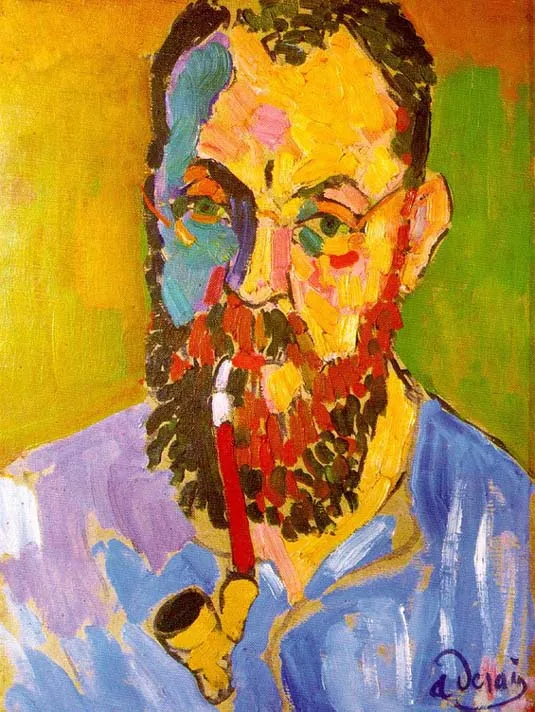
Andre Derain,"Henri Matisse,"1905

Woman with a hat, Henri Mattisse, 1905
A brief video that explains the history of Fauvism (play this in the class to introduce students to this style of art...directions on how to connect to the TV are just below this video player)
You will also need to connect one of the parent volunteers' iPhone to the tv in the classroom in order to play videos and show pictures to help them understand the project. Here are some instructions on how to pair an iPhone to the tv. First use the bigger LG remote (the remotes are hanging on the left hand side of the back of the tv with velcro). Next use the Apple TV remote and press the menu button. Next go to the screen mirroring setting on the iPhone. Click screen mirroring and select SKY 189 (that is the room number for the art room). A passcode will appear on the tv screen to enter on the iPhone. From there anything on the iPhone will show up on the tv. You can pull up this blog and play the videos directly from the iPhone. (These instructions are posted near the tv for your reference as well).


The red circle indicates the screen mirroring setting on iPhone

Supplies:
Black Permanent Markers
Pencils
Mixed Media paper (3-5 sheets per student)
Messy mats
Oil Pastels
Chalk Pastels
Watercolor paints
Liquid Starch
Styrofoam plates
Paint brushes
First set up the tables for students to do their self portraits prior to them arriving to the classrooom. You will need messy mats (large black paper) at each students' desk with 3-5 pieces of white paper for them to draw their self portraits on. They will each need a permanent marker, too.
This project uses many different materials! Depending on what grade you are working with, you might not have time to do all of the steps or use all of the materials. That's ok! Just keep an eye on the clock and be flexible when it comes to how many steps they get to. First each table will need the acrylic containers filled with chalk pastels, 1 set for 2 students to share is adequate. You will also need to have the ice cube trays filled with oil pastels with a selection of rainbow colors for the table to share. For the last steps of the project, each table will need watercolors, paint brushes and the water bowls with sponges.

acrylic tray with chalk pastels

ice cube tray with oil pastels

caddy with watercolor paints & paintbrushes


This is what your table should look like when it’s all set up!
Here is a video that you must play to walk the students through the self portrait process. It would be a good idea to watch the video yourself beforehand, too. :) Let the video play for a few minutes and then pause occasionally to let the students get caught up.
The finished product! Can't wait to see all of the Skyline self portraits!

When you have finished your project, you can place them in the drying rack at the back of the classroom to dry. Please make sure the students write their name on the back of the paper. If you can also have them write their teacher's name on the back that will help in case we get projects mixed up. Especially since almost all of the students are doing the same project for this first round! :)

There are also labeled areas for each class to have their art stored after it dries completely. If you need to move projects from the drying rack so you have space to dry the next project, please carefully put the projects in the right teacher's area in this cabinet.

Please wash all paintbrushes out in the sink and leave them to dry in the drying rack next to the sink! This will ensure the paintbrushes are ready for the next project.


No comments:
Post a Comment